整合您的應用程式
註冊應用程式,透過代管的 OpenID Connect 頁面讓使用者登入,或呼叫經簽章的伺服器 API。
您的應用程式可透過以下兩種方式之一接入 Yeap Verify:
| 方式 | 適合 |
|---|---|
| 代管登入頁(OpenID Connect) | 已支援 OpenID Connect 的應用程式。Verify 會顯示數字並等待核准;您的應用程式取得 ID 權杖 |
| 伺服器 API | 由您自行加入第二道步驟的應用程式:推播、TOTP 或備用碼 |
兩種方式都需要在團隊後台中註冊一個應用程式。
註冊應用程式
- 在團隊後台中開啟 Yeap Verify → 應用程式,點選 新增應用程式。
- 輸入 名稱。使用者在 Yeap Verify 中核准登入時會看到它。
- 若使用代管登入頁,請新增您的 重新導向 URI,每行一個。可選擇新增 Webhook 網址(HTTPS)以接收結果。
- 點選 儲存。Client ID 與 Client secret 只會顯示一次。密鑰只能存放在您的伺服器上。
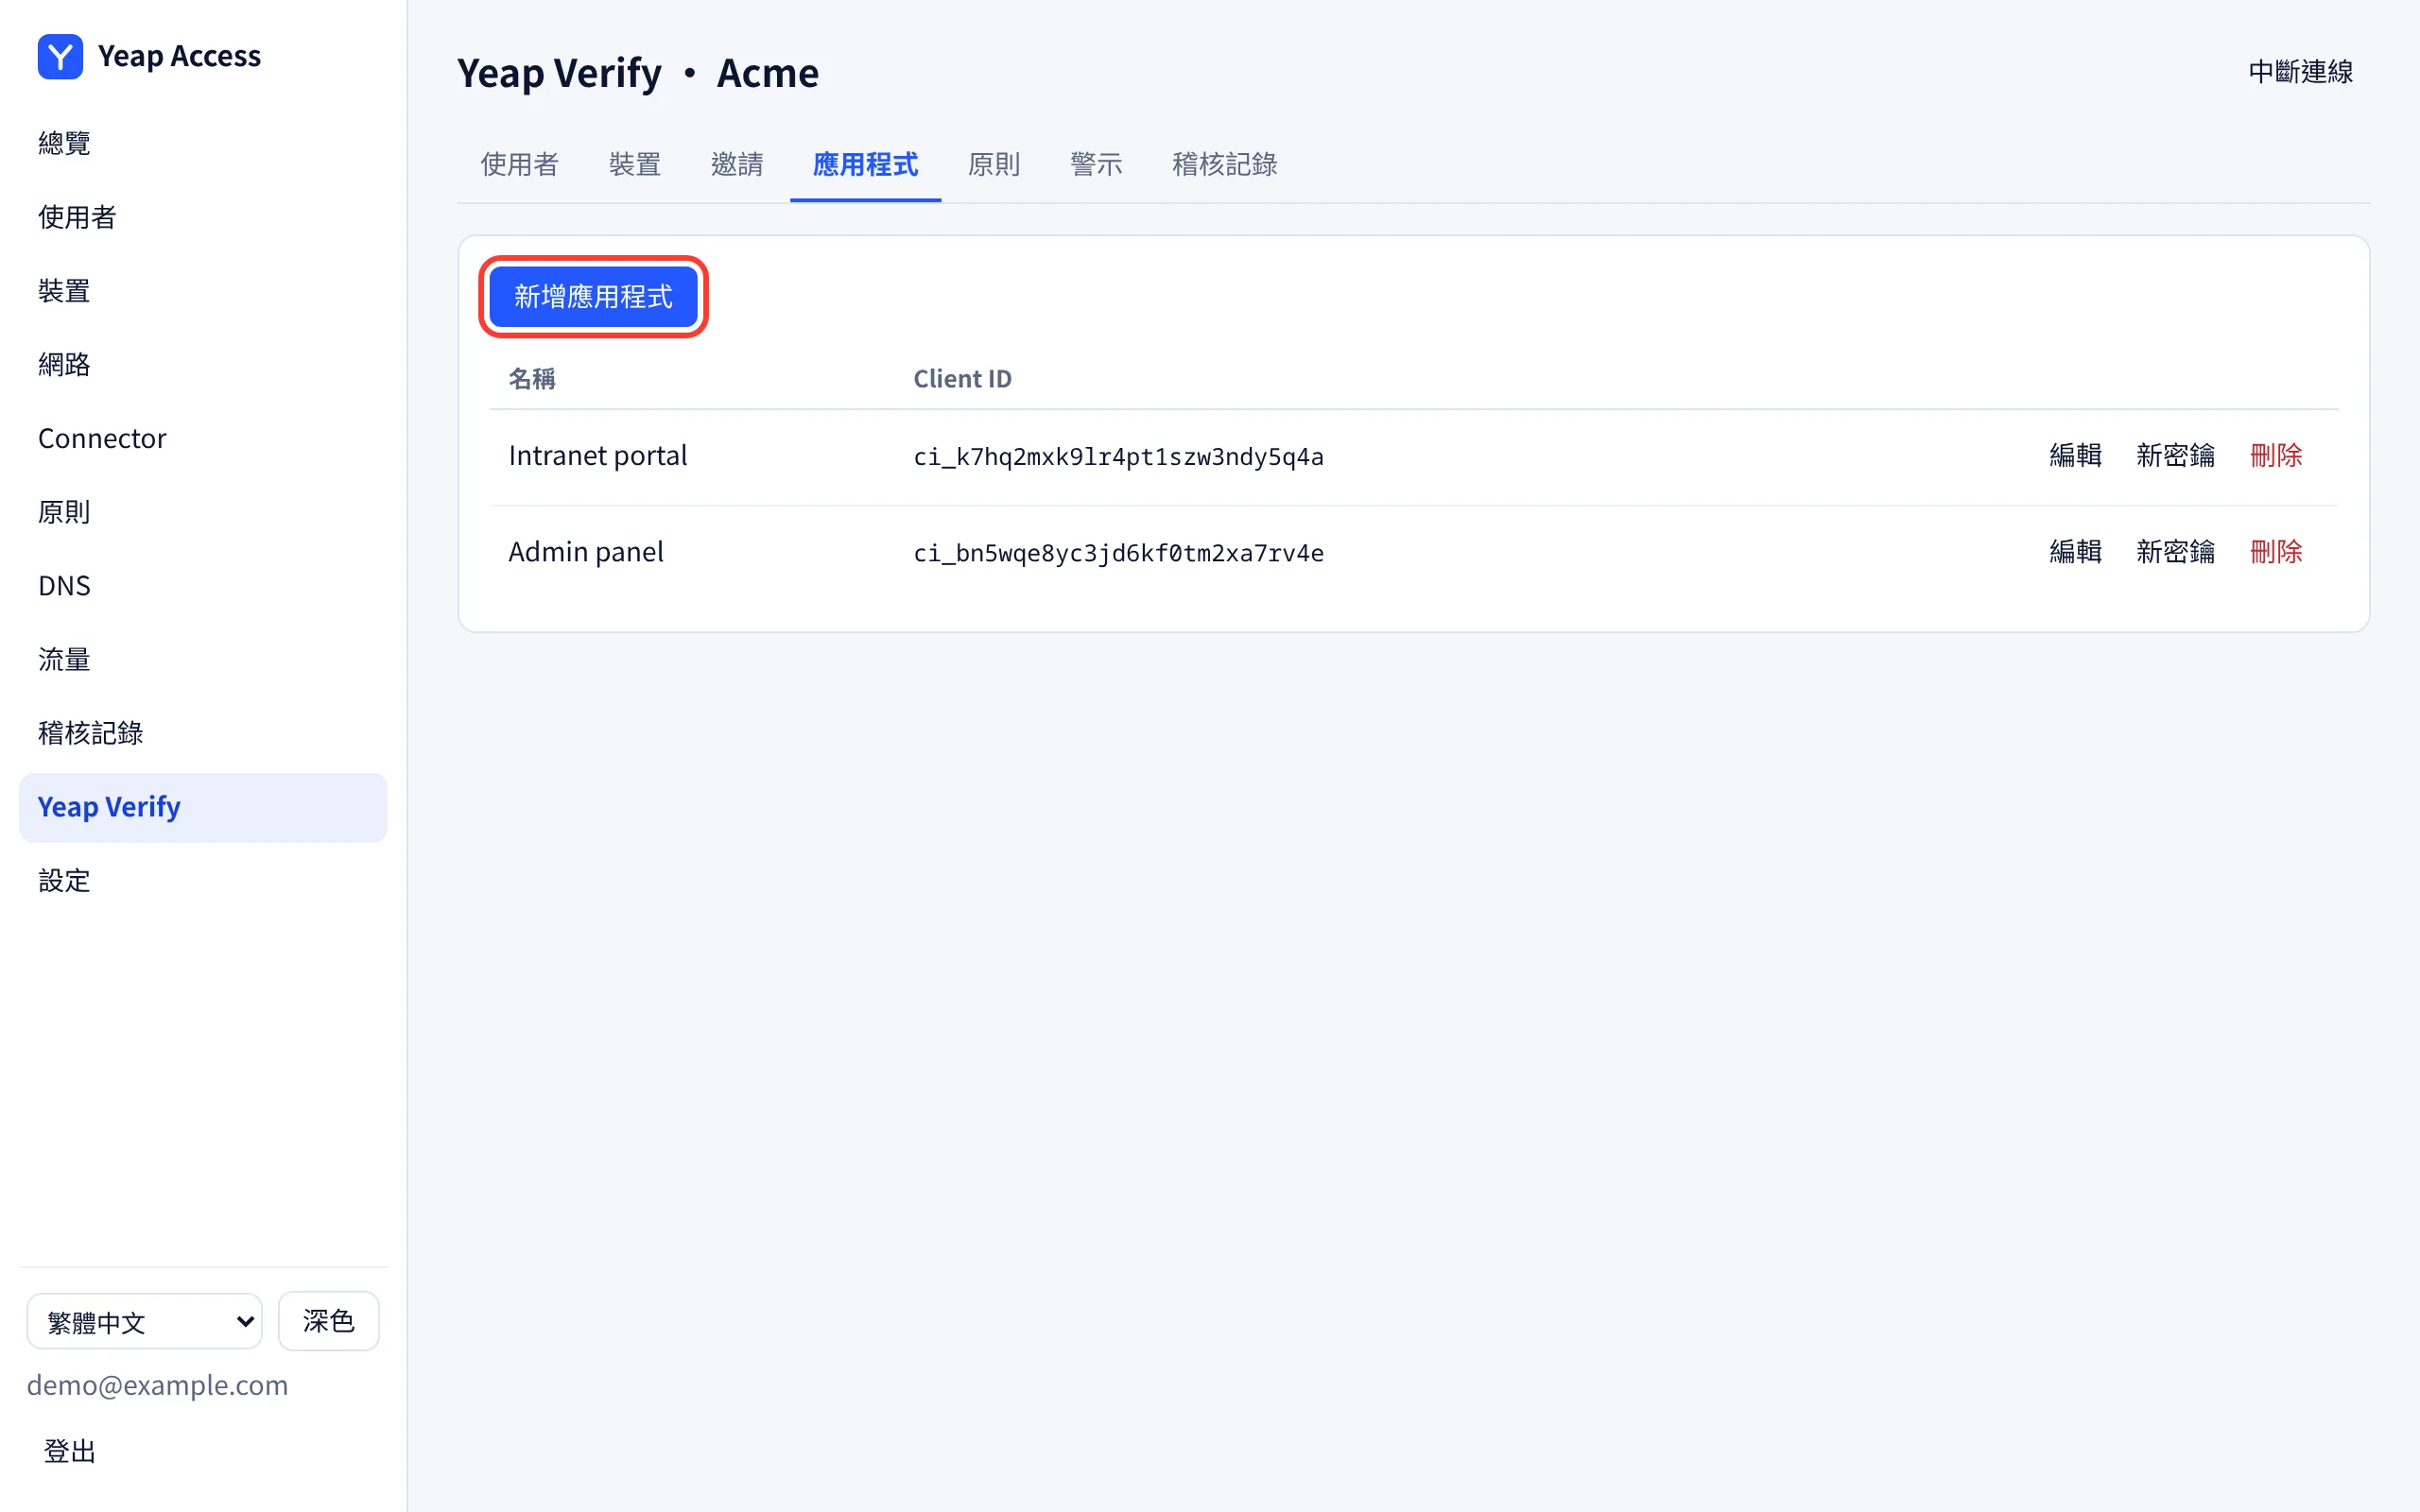
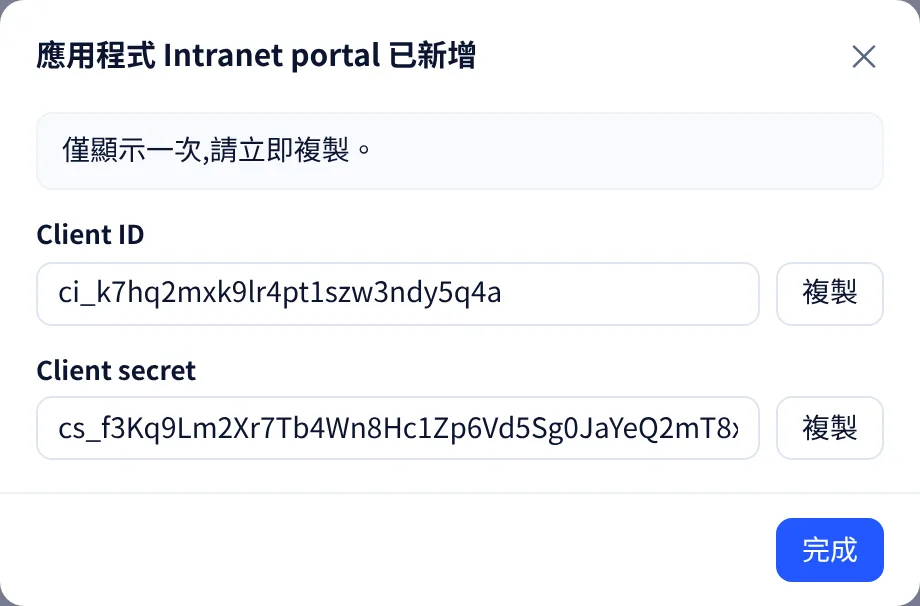
新密鑰 會取代密鑰;舊密鑰立即失效。
在 Yeap Verify → 原則 下,每個應用程式有兩項設定:
| 設定 | 意義 |
|---|---|
| Verify 無法使用時 | 當您的應用程式無法連到 Verify 時,封鎖(預設)或 允許 登入。由您的應用程式執行;伺服器 API 的健康檢查會回傳此設定 |
| 數字位數 | 使用者需要輸入幾位數字:3 到 6。敏感的應用程式請使用較多位數 |
代管登入頁(OpenID Connect)
您團隊的登入頁是 https://<team>.verify.yeap.cloud,它同時也是 issuer。設定位於 https://<team>.verify.yeap.cloud/.well-known/openid-configuration。
| 流程 | 搭配 PKCE(S256)的授權碼流程。scope 必須包含 openid;state 為必填 |
| 用戶端驗證 | client_secret_basic 或 client_secret_post |
| ID 權杖 | 以 ES256 簽章。聲明包含 sub(Verify 使用者 ID)、preferred_username、amr 與 tx_id |
| 指定使用者 | 傳入 login_hint_token,即由您的伺服器簽章的短效 JWT(見下文)。不接受一般的 login_hint |
使用者已在您的應用程式中輸入過密碼,因此您知道他是誰。您的伺服器以 client secret 簽章,產生 HS256 JWT 格式的 login_hint_token:
{ "iss": "<client ID>", "aud": "https://acme.verify.yeap.cloud", "sub": "alice", "exp": <now + up to 300 seconds> }接著將瀏覽器重新導向到 https://acme.verify.yeap.cloud/oauth/v1/authorize,並帶上 response_type=code、client_id、redirect_uri、scope=openid、state、nonce、code_challenge、code_challenge_method=S256 與 login_hint_token。該頁面會顯示數字,使用者在手機上核准後,會帶著授權碼重新導向回您的應用程式。請在設定中列出的權杖端點以授權碼換取權杖。
伺服器 API
基礎 URL:https://verify.yeap.cloud。每個請求都必須以應用程式的 client secret 簽章。
| 標頭 | 值 |
|---|---|
Yeap-Client-Id | 應用程式的 Client ID |
Yeap-Timestamp | 目前的 Unix 時間(秒)。與伺服器時鐘的差距不得超過 5 分鐘 |
Yeap-Nonce | 16 到 64 個取自 A–Z a–z 0–9 _ - 的隨機字元,每個請求都要重新產生 |
Yeap-Signature | 以 client secret 對下列六行計算的十六進位 HMAC-SHA256 |
簽章文字是以下各行以 \n 串接而成:yeap-verify-hmac-v1、請求方法、含查詢字串的路徑、時間戳記、nonce,以及請求本文的十六進位 SHA-256(GET 請求取空本文的值)。
端點
| 請求 | 回應 |
|---|---|
GET /api/v1/health | {"status":"ok","fail_mode":"closed"}。在發起登入前呼叫 |
POST /api/v1/auth | 發起一次驗證。本文:user、factor(push、totp 或 backup,預設 push)、選填的 ip 與 app(顯示在手機上),TOTP 與備用碼需要 passcode |
GET /api/v1/auth/{tx_id} | {"tx_id":…,"status":…} |
status 起初為 pending,之後變成 allow、deny、timeout 或 fraud(使用者點選了 不是我本人)其中之一。對於 push,回應中還包含要顯示給使用者的 number 與 expires_at。每 1 到 2 秒輪詢一次,或使用 webhook。對於 totp 與 backup,回應立即就是最終結果。
範例(Python)
import hashlib, hmac, json, secrets, time
import requests

BASE = "https://verify.yeap.cloud"
CLIENT_ID = "ci_..."
SECRET = "cs_..."

def call(method, path, body=None):
    data = json.dumps(body).encode() if body is not None else b""
    ts, nonce = str(int(time.time())), secrets.token_urlsafe(24)
    text = "\n".join(["yeap-verify-hmac-v1", method, path, ts, nonce, hashlib.sha256(data).hexdigest()])
    headers = {
        "Yeap-Client-Id": CLIENT_ID, "Yeap-Timestamp": ts, "Yeap-Nonce": nonce,
        "Yeap-Signature": hmac.new(SECRET.encode(), text.encode(), hashlib.sha256).hexdigest(),
    }
    if body is not None:
        headers["Content-Type"] = "application/json"
    return requests.request(method, BASE + path, data=data, headers=headers, timeout=10).json()

tx = call("POST", "/api/v1/auth", {"user": "alice", "factor": "push", "ip": "203.0.113.7", "app": "Intranet portal"})
print("Enter this number in Yeap Verify:", tx["number"])
while (r := call("GET", "/api/v1/auth/" + tx["tx_id"]))["status"] == "pending":
    time.sleep(1.5)
print(r["status"]) # allow, deny, timeout or fraud錯誤
| HTTP | error | 意義 |
|---|---|---|
| 401 | unauthorized、timestamp_out_of_window、replayed_request | 簽章或 Client ID 錯誤、時鐘誤差超過 5 分鐘,或 nonce 遭重複使用 |
| 404 | user_not_found | 沒有該名稱的 Verify 使用者 |
| 429 | rate_limited | 該使用者的請求過多。請稍後再試 |
| 503 | org_suspended 等,帶有 "status":"unavailable" | Verify 無法回應,例如方案已到期。請依您的 Verify 無法使用時 設定處理 |
Webhook
若應用程式設定了 Webhook 網址,Verify 會以 POST 傳送每個最終結果,JSON 本文為 {"event":"auth.result","tx_id":…,"status":…,"reason":…,"at":…}。它以相同方式簽章,使用標頭 X-Yeap-Client-Id、X-Yeap-Timestamp、X-Yeap-Nonce 與 X-Yeap-Signature,簽章路徑為您 webhook 網址的路徑。請先驗證簽章再信任該請求。